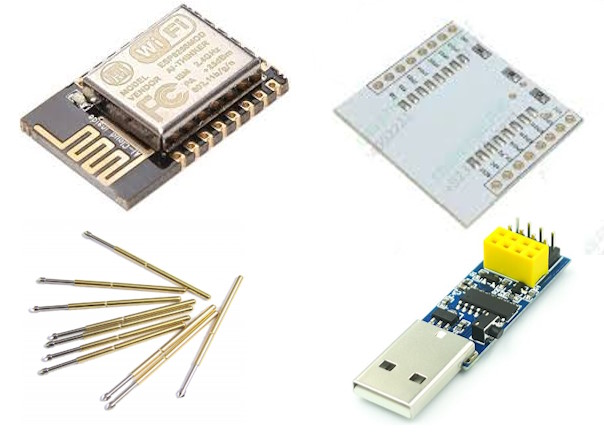
 ESP12
MCU (variant E or F) (Pictured)
ESP12
MCU (variant E or F) (Pictured)ESP12 Adapter Plate (Pictured)
ESP-01 programmer (See note) (Pictured)
Pogo pins (16) (Pictured)
Stripboard
Acrylic or similar
2x8 header (See note)
Screws and standoffs.
A hardware project for a programming fixture for ESP12 modules.
This project documents the construction and use of a fixture for mounting an ESP12 MCU module for programming. The fixture supports a connection to an ESP-01 USB programming adapter. The end result is that a ESP12 chip mounted on the carrier plate can be directly connected to a USB port for programming without the need to solder header pins to the adapter - the fixture uses pogo pins and a clamp to hold the ESP12 to the fixture. Once programmed the ESP12 with adapter plate can be soldered into the project, providing a minimal (32mmx28mmx5mm) footprint for a MCU with 11 I/O ports that include UART, SPI, IC2 and ADC.
A common usage would be for one-time programming of the ESP12 with a simple OTA sketch, so that all future updates can be via OTA.
 ESP12
MCU (variant E or F) (Pictured)
ESP12 Adapter Plate (Pictured)
ESP-01 programmer (See note) (Pictured)
Pogo pins (16) (Pictured)
Stripboard
Acrylic or similar
2x8 header (See note)
Screws and standoffs.
Note: The ESP-01 programmer used in this project had both male and female headers. Therefore, the programming fixture could use either a male or female header for connection. The option chosen was to install a female header on the fixture, and use the male header on the ESP-01 programmer. This is an arbitrary choice, and either combination will work, but of course it must mate with the ESP-01 programmer that is used..
The pogo sticks are also an arbitrary choice - there are many variations
that would do the job as well.
1. They must be mounted firmly. Some models have a base that
sits firmly on the PCB, however the large base may mean that they cannot
be placed at the 0.1" spacing that the ESP12 adapter requires. This
project used long versions without a base, so that they push into the PCB
holes and can be mounted across two pieces of drilled acrylic - the
separation of the acrylic pieces creates a very strong fixture with the
pins maintained in an absolutely vertical line.
2. The springs must allow firm pressure before bottoming out.
3. The tips must align easily with the holes in the ESP12 adapter without
passing through.
The pogo pins chosen for this project are P100-LM3.
This description assumes all 16 pins of the ESP12 will be brought out for access, even though only 8 are required in order to use the fixture for programming. The additional connections mean that there is the option of fully testing and debugging the ESP12 software while the device is still in the fixture. If this option is not required the additional connections can be deleted.
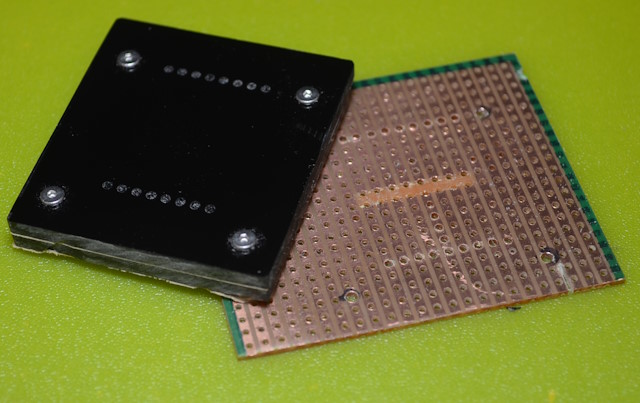 The
mounting consists of three layers. The bottom layer is a piece of acrylic
drilled for the hole pattern of the ESP12 adapter plate and a push fit for
the pogo pins. Immediately above this is the strip board. The second
layer of acrylic, with the same drill pattern as the first, is mounted
well up the shaft of the pogo pins.
A CNC-controlled drill is the best option for getting the holes correctly aligned and identical for each piece of acrylic. A sample GCode file for the drill pattern is included below. If the holes are drilled by hand then a jig will be required. A jig could be made from a piece of protoboard large enough to cover both rows of pins, and both pieces of acrylic should be clamped to the jig for drilling.
The three layers should then be firmly clamped together and drilled for mounting holes. The standoffs used in this case required a 3mm clearance hole. They were positioned on the corners of a 33mm square. At this point the layers can be trimmed to size and three of the edges finished. The fourth edge of the stripboard is left long to provide spare holes for the wiring to exit. Be sure to mark one edge of each piece to ensure they are re-assembled with the correct orientation.
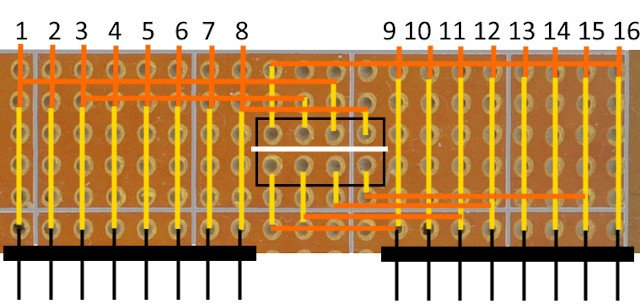
With the copper side of the stripboard uppermost, and the traces running across the width of the adapter plate, cut a separating line down the middle for 8 rows. That is, configure the board with 2 sets of 8 rows. Solder thin hookup wire through from the underside, one to each track. The image shows these wires laid out in a logical pattern and brought out through the row of holes along the bottom of the stripboard. Ensure the wires do not cross over each other, and are clear of the mounting holes. Organizing the wires like this significantly simplifies the subsequent soldering. See the drawing below.
The pogo pins are pushed into the upper acrylic layer first (the spring part of the pins will not fit through the drilled holes). The position of this layer will be adjusted later.
The pins are then pushed though the stripboard, with the copper side uppermost and the traces running across the module (eg, Vgg, gap, Gnd), and the wires exiting underneath.
The lower acrylic layer is then fitted at the base of the pogo pins and pushed firmly against the hookup wires.
The stripboard and the lowest layer of acrylic are clamped together on a flat surface, using the pins and the mounting holes for alignment. The pins are pushed firmly down onto the flat surface, to ensure they are all the same height. The upper acrylic layer is used to ensure that the pins are parallel and vertical - the standoffs can be temporarily installed to assist. The pins can then be soldered to the upper surface of the stripboard.
The standoffs are then permanently installed so that the layers are stacked with the upper layer at a height that is a compromise between the size of the finished fixture and the need for a solid structure for the pins, and matches an available standoff. 10mm standoffs were used in this case. Note that a smaller standoff is also used at the bottom layer, to allow screwing through from the base when the the fixture is mounted in a case. Once the boards are screwed into the two sets of standoffs the pin assembly is complete.
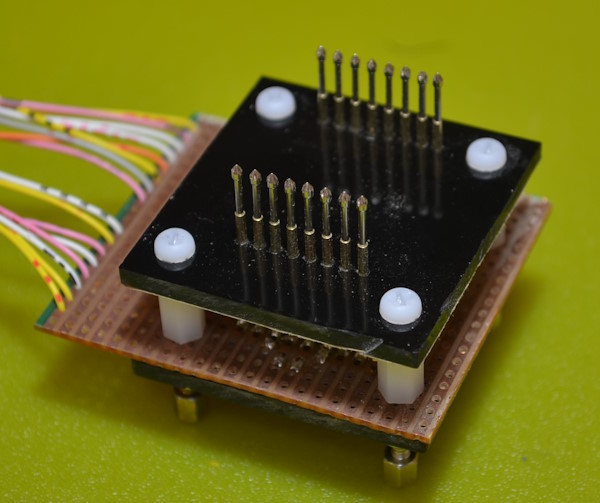
The wires brought out from the stripboard are connected through to a second piece of board. This piece consists of 20 short tracks* - 16 for the ESP12 pins and 4 for the programming header. Because this piece will be handled quite extensively during the soldering and final assembly, it is recommended to loop the hookup wire through two holes in each track before soldering to the copper on the underside. Two sets of 1x8 angled headers are soldered along one edge of the board, and leads run from the tracks on the board across to the header. The single-row headers can be set on the edge of the strip to provide maximum length for the pins, but the 2x8 header must be set at least one trace back from the edge so there is a set of holes along the edge that can be wired to. The tracks under the header need to be cut between the two rows of pins.
For this project the header for the USB interface was soldered in the middle of the strip, and the other leads set out to each side. This connection is the point where the layout could be changed from the seemingly random arrangement on the ESP12 adapter to a logical arrangement for prototyping, however in this project the layout of the headers has followed the pin positions from the ESP12 adapter plate - 1 to 8 on one side and 9 to 16 on the other.
* 20 is possible because the header on the board is female. If the alternate arrangement is adopted - a male header on the fixture - then the shroud for the header means that the immediately adjacent holes in the stripboard might not be accessible, so a 22-strip section would be needed. The width of this piece actually establishes the minimum width of the completed module.
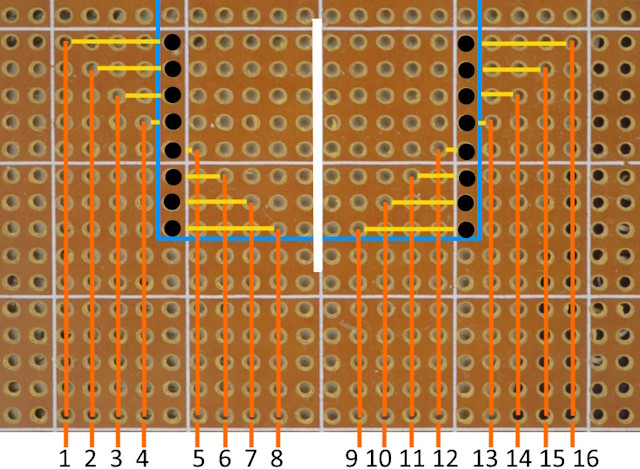
The image shows the wiring for the stripboard with the traces running horizontally. The portion of the traces that is actually used is marked in yellow - the remaining portions can be ignored. From the trace for each pin, hookup wire (orange) is run to the end of the board. At this point it is looped through the board to provide a secure fixing and to keep the wiring organized. Not that one or two pairs of wires will have to be routed past the mounting holes, so allow a little extra length for that.
The white strip marks the isolating cut in the traces.
The numbering used in this description runs around the ESP12 module from top left anticlockwise to top right, as for a DIP. The programming header as oriented in this diagram is numbered left to right alternating bottom to top. The pins are:
| ESP Pin | Name | Hdr. Pin | ESP Pin | Name | Hdr. Pin |
| 1 | RST | 6 |
16 | TXD | 2 |
| 2 | ADC | 15 | RXD | 7 | |
| 3 | CH-PD/EN | 4 |
14 | GPIO5 | |
| 4 | GPIO16 | 13 | GPIO4 | ||
| 5 | GPIO14 | 12 | GPIO0 | 5 | |
| 6 | GPIO12 | 11 | GPIO2 | 3 | |
| 7 | GPIO13 | 10 | GPIO15 | ||
| 8 | VCC | 8 |
9 | GND | 1 |
Note that some adapter plates incorrectly label pin 4 as GPIO15.
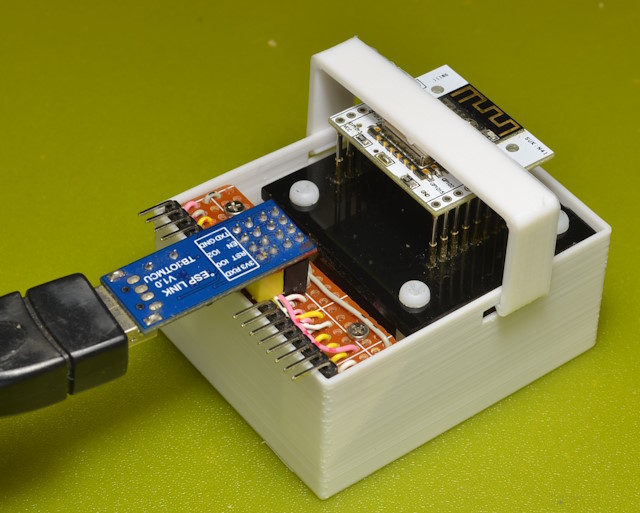
The fixture and the separate header piece are mounted in a 3D-printed case, with the fixture mounted with screws from the underside into the bottom spacers, and the extension piece mounted so that the pins protrude at a suitable height above the edge of the case. The case has slots let into the sides to carry the retaining piece - in this case a 3D-printed clamp with tabs that engage with the slots. An alternative which also worked well is a coil spring with extended ends that can be bent to match the height of the module above the case and clip into holes let into the side. The retaining piece needs to be firm enough to ensure that all pins contact the thru-holes in the module. Getting the pin heights equal in the original assembly is important in keeping this pressure to a minimum.
The programming module can then be connected to the header and the ESP12 programmed as required.
A modification that has not been tested but which could be considered is to interrupt the VCC connection between the programming socket and pin 8, and run it via a jumper that can be set to either 3.3V from the programming header or 5V from an external socket and USB lead. That would enable the fixture to be used with ESP modules that had already been modified for a 5V supply.
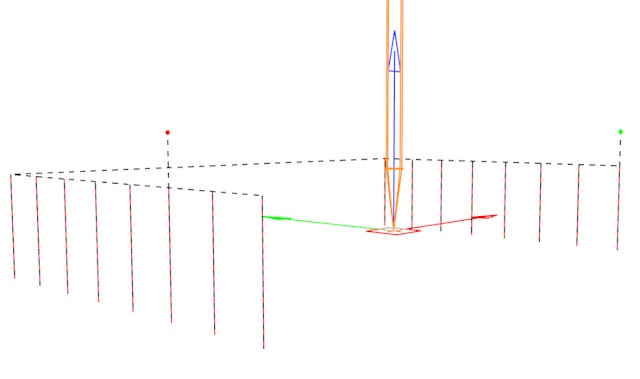 Drill pattern GCode for the pin mounting plates.
 This is configured for GRBL. Drill depth is 3mm. Start point is the workpiece top surface at the centre of the drill region.